Digital Elevation Model (DEM) Terrain Displacement
In the save options window you want to set:

*Note: In the "Range" you need to enter your "Min Elevation" and "Max Elevation" from the rangeStatistics created on the previous page. This will equalize all of the greyscale images to the same black-to-white elevation ratios. That way they match up seamlessly when stitching them together. If you did not do it this way, the images would have drastic variances when stitched together and the displacement would have holes in it where neighboring images met. Being that we set the Units to Feet, you must enter the feet values for the elevation. If you need a calculator to convert meters to feet, you can download my script
Click the [SAVE] button and accept the default name for the file. It will look something like:
* "GoldenLakes_971x1401_PC.raw"
The 971x1401 is the image size. You will need these numbers when reading the file into Photoshop later, so I just find it easier to leave them as part of the *.raw file name for reference. Go ahead and repeat this process to convert the rest of our 15 quads.
Here comes the fun part! Once you have all of your quads converted to *.raw files crack open Adobe Photoshop. Currently in Maya v. 6.5, Mental Ray has a texture limitation of 8k (8192 x 8192). Even though Mental Ray says it can handle 8k textures, I've had problems when using exactly 8k images, so I would just go a little smaller like around 8100 x 8100 resolution. Create a new document in Photoshop and set:
Now you want to open all of the *.raw files you created with PullSDTS. When you select a *.raw file to open you are greeted with an options box.

For the "Dimensions" you need to enter the Width and Height values from the quad names we saved while exporting from PullSDTS. (...971x1401...) Then you want to set:
* Depth = 16 Bits
* Byte Order = IBM PC
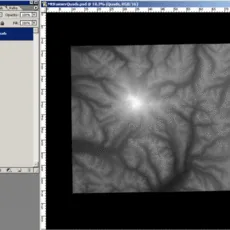
Repeat this process opening all 15 *.raw files into Photoshop. Next you need to drag the "Background" layers for each of these files into our 8100 x 8100 image we created earlier. Lay the images out so that they match the quad layout from our USGS Quad diagram. As you are dragging them over you may want to name each new layer apropriatly.

I also drag them in order from the top left quad across to the bottom right quad. This way it keeps the layers neatly in order inside the new image. You will need to set the "blending mode" to Lighten for each layer. This is so that when you start butting the images the black border will disappear leaving you with only the greyscale image. This is also why we set the background color of the new image to Black.
In the save options window you want to set:
- * Units = Feet
- * Byte Order = "PC" (Intel)
- * Header = None
- * Grays = Equalize to Range*
- * Bit Depth = 16
- * Fill = Black
*Note: In the "Range" you need to enter your "Min Elevation" and "Max Elevation" from the rangeStatistics created on the previous page. This will equalize all of the greyscale images to the same black-to-white elevation ratios. That way they match up seamlessly when stitching them together. If you did not do it this way, the images would have drastic variances when stitched together and the displacement would have holes in it where neighboring images met. Being that we set the Units to Feet, you must enter the feet values for the elevation. If you need a calculator to convert meters to feet, you can download my script
Click the [SAVE] button and accept the default name for the file. It will look something like:
* "GoldenLakes_971x1401_PC.raw"
The 971x1401 is the image size. You will need these numbers when reading the file into Photoshop later, so I just find it easier to leave them as part of the *.raw file name for reference. Go ahead and repeat this process to convert the rest of our 15 quads.
Here comes the fun part! Once you have all of your quads converted to *.raw files crack open Adobe Photoshop. Currently in Maya v. 6.5, Mental Ray has a texture limitation of 8k (8192 x 8192). Even though Mental Ray says it can handle 8k textures, I've had problems when using exactly 8k images, so I would just go a little smaller like around 8100 x 8100 resolution. Create a new document in Photoshop and set:
- * Width = 8100
- * Height = 8100
- * Color = RGB 16 bit
- * Background color = Black
Now you want to open all of the *.raw files you created with PullSDTS. When you select a *.raw file to open you are greeted with an options box.
For the "Dimensions" you need to enter the Width and Height values from the quad names we saved while exporting from PullSDTS. (...971x1401...) Then you want to set:
* Depth = 16 Bits
* Byte Order = IBM PC
Repeat this process opening all 15 *.raw files into Photoshop. Next you need to drag the "Background" layers for each of these files into our 8100 x 8100 image we created earlier. Lay the images out so that they match the quad layout from our USGS Quad diagram. As you are dragging them over you may want to name each new layer apropriatly.

I also drag them in order from the top left quad across to the bottom right quad. This way it keeps the layers neatly in order inside the new image. You will need to set the "blending mode" to Lighten for each layer. This is so that when you start butting the images the black border will disappear leaving you with only the greyscale image. This is also why we set the background color of the new image to Black.
Comments
-
Hey Im getting an error when I try to load the DEM to get the grayscale image. In the PullSDTS command prompt it says, "AttributeError: 'unicode' object has no attribute 'open'" Do you have any suggestions to get past this?
-
Same problem here as well..Have tried for quite sometime now to get it to work. Would like some input on how to solve this error. Thanks :)
-
Im having the same problem here. Here is the Python Report Exception in Tkinter callback Traceback : File "C:\Python26\lib\lib-tk\Tlinter.py", line 1410, in __call__ return self.func<*args> File "C:\Users\Horza\Downloads\pullsdts\pullsdts.py@, line 395, in demview xfer.getSpecial<'CEL0',w> File "C:\Users\Horza\Downloads\pullsdts\sdts.py@, line 1419, in get Special retval = demSpeedReader \fast kludge File "C:\Users\Horza\Downloads\pullsdts\sdts.py@, line 354, in demSpeedReader f.open<'r'> AttributeErroe 'unicode' object has no attribute 'open' Ive never used python before and I downloaded it for this tutorial. I also went about the hard way of finding out the Ne Sw statistics as I wanted to learn how to do this the real way instead of using the stats you provided. Suffice to say, I was a little disappointed when I failed at the next stage : ( Any help greatly received. : )
-
I had the same problem with pullSDTS, but got it working by opening the tarball (gz) files in it instead of unpacking them with another program. See the documentation for pullSDTS.
-
I bounced into a couple of the above problems, too. For those who still didn't find a solution: when the error you get is in loading the DEM infos (from the tar.gz file), my workaround was to pre-unpack the files with 7zip (I'm not sure if it's what Thom Falter suggested, or the opposite; in my case it worked, anyway) I then filtered the .ddf files with pullSDTS's option "SDTS transfer *iden.ddf" and selected the only available one. when the error is in loading the DEM image, instead, and you get the message some reported above: AttributeError: 'unicode' object has no attribute 'open' what I did to solve (no idea how clean the trick is) is changing line 350 in sdts.py from: if type(celFile) == type('string'): to: if isinstance(celFile, (str, unicode)): Hope that helps, s
-
@Stefano Cieri You Brilliant SOB! It worked! I can't thank you enough. Also, the sole reason I opened an account here was so I could thank you. Thanks again!
-
Does any one know if it's possible to get the nurbs mesh to match the displacement map?
-
So, I came across a way to generate a mesh of the surface using photoshop. Once you have the image in photoshop go to 3D> mesh> plane. scale the y accordingly. Then go to 3d> export> obj. Import the Obj in Maya and you'll have a surface.