
Maya Tutorials
Tutorials
-
![Copy one side of animation to another side in WalkCycles/RunCycles]()
-
![Arnold for kids]() This is set of triks how to organase workflow with complex scenes using MtoA. Multitexture material - one shader, different textures. You can reduce amount of shaders in scene and speed up look development with one material and individual textures on each object. With this setup, shapes shar...
This is set of triks how to organase workflow with complex scenes using MtoA. Multitexture material - one shader, different textures. You can reduce amount of shaders in scene and speed up look development with one material and individual textures on each object. With this setup, shapes shar... -
![4 Easy Steps to Rigging a Character with Rigger]() 1. Prepare the model for rigging 2. Create a skeleton. Adjust the orientation of the bones to your liking or use the default settings. 3. Use Rigger to create inverse kinematics chains (www.rigger.ws). 4. Skin the model www.rigger.ws
1. Prepare the model for rigging 2. Create a skeleton. Adjust the orientation of the bones to your liking or use the default settings. 3. Use Rigger to create inverse kinematics chains (www.rigger.ws). 4. Skin the model www.rigger.ws -
![The scriptJob and the scriptNode]() mlouala 12,502 viewsHi there, Here is a tutorial to explain you how you can control advanced behavior in Maya when toggling an attribute, the technique can be used for several other purposes, it's basically the way to create inner callbacks in your Maya's scene. The tutorial has been originally wrote for...
mlouala 12,502 viewsHi there, Here is a tutorial to explain you how you can control advanced behavior in Maya when toggling an attribute, the technique can be used for several other purposes, it's basically the way to create inner callbacks in your Maya's scene. The tutorial has been originally wrote for... -
![Color syntaxing the Script Editor Reporter]() Hi there, As a script TD, rigger, or anybody who need to open the Maya's Script Editor, aren't you tired to scroll through tons of grey lines like these one below ? What about color syntaxing all this stuff ? Here is a tutorial to set a PyQt class in order to override the col...
Hi there, As a script TD, rigger, or anybody who need to open the Maya's Script Editor, aren't you tired to scroll through tons of grey lines like these one below ? What about color syntaxing all this stuff ? Here is a tutorial to set a PyQt class in order to override the col... -
![Create a good topological grid from marvelous using maya]() Monteg 6,292 viewsHi, this tutorial show you how to create a good topological grid using maya. If someone used marvelous he knows that the grid no so good even if you use quads. Hope you like it.
Monteg 6,292 viewsHi, this tutorial show you how to create a good topological grid using maya. If someone used marvelous he knows that the grid no so good even if you use quads. Hope you like it. -
![UV pass shader]() Hi Amigos, This tutorial gives you knowledge on the concept of UV pass shader. UV pass shader is used to render UV pass which will be used in compositing to modify texture of the selected object. To start, We will try to understand the concept of UV's in Maya above picture is UV layout in ...
Hi Amigos, This tutorial gives you knowledge on the concept of UV pass shader. UV pass shader is used to render UV pass which will be used in compositing to modify texture of the selected object. To start, We will try to understand the concept of UV's in Maya above picture is UV layout in ... -
![How to use Attribute Collection 2.02 to build a custom UI]() Attribute Collection lets you interactivly build and edit a custom user interface that can be saved with the scene. You can link attributes, group them in various layouts, add buttons and icons. Attribute Collection is part of the Bonus Tools for Maya and can be downloaded here.
Attribute Collection lets you interactivly build and edit a custom user interface that can be saved with the scene. You can link attributes, group them in various layouts, add buttons and icons. Attribute Collection is part of the Bonus Tools for Maya and can be downloaded here. -
![Spider Animations Tutorial]() Greetings, I made this spider animations tutorial originally for my blog 'Greenhorn CG' but I wanted to share it to more people so here it is. (I had to do some modification to some of the links and texts so my apology if I made any mistake here) I used Maya (but I will only talk about the ...
Greetings, I made this spider animations tutorial originally for my blog 'Greenhorn CG' but I wanted to share it to more people so here it is. (I had to do some modification to some of the links and texts so my apology if I made any mistake here) I used Maya (but I will only talk about the ... -
![Fix broken render setting window using simple mel command]() Now and again one of the numerous Maya bugs stops you been able to view the render settings window. You can open it up but there is no information there, preventing you from changing any render settings. A quick way to fix this is to do the following – Open up the script editor Type in th...
Now and again one of the numerous Maya bugs stops you been able to view the render settings window. You can open it up but there is no information there, preventing you from changing any render settings. A quick way to fix this is to do the following – Open up the script editor Type in th... -
![Quick maya tutorial - Parenting Objects To Characters Hand]()
-
![Randomly Shuffled Texture Tiles]() Shuffle a limited set of Maya texture map tiles to create the illusion of randomness and variety.
Shuffle a limited set of Maya texture map tiles to create the illusion of randomness and variety. -
![Instancers (Flying butterflies)]() Instancers Version: Maya 2008 Hi everyone this is my first tutorial I hope you learn it and Sorry for bad English Step 1: You must create a character to animate and it must be a cycle animate You can use any character for this tutorial I m use a Butterflie...
Instancers Version: Maya 2008 Hi everyone this is my first tutorial I hope you learn it and Sorry for bad English Step 1: You must create a character to animate and it must be a cycle animate You can use any character for this tutorial I m use a Butterflie... -
![Programming with PyMel for artists]() If you think that you have artistic brain and developing is beyond your possibilities, believe me, your just lazy. You dont need any unique knowledge or special brain structure. You just need willingness to code and necessity of practical application of developing(and you defiantly have it...
If you think that you have artistic brain and developing is beyond your possibilities, believe me, your just lazy. You dont need any unique knowledge or special brain structure. You just need willingness to code and necessity of practical application of developing(and you defiantly have it... -
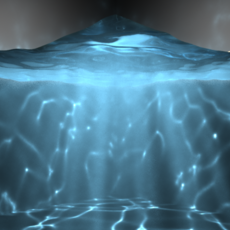
![Fluid Caustic Volume Shader Setup for Maya 2014]() 1. Overview This tutorial walks through the process of creating caustic effects in Autodesk Maya 2014 x64, using advanced shader techniques. It will be most useful to artists who already know some Maya basics: modeling, assigning materials, using the Channel Box, Attribute Editor (CTRL + A...
1. Overview This tutorial walks through the process of creating caustic effects in Autodesk Maya 2014 x64, using advanced shader techniques. It will be most useful to artists who already know some Maya basics: modeling, assigning materials, using the Channel Box, Attribute Editor (CTRL + A... -
![How To Use Mocap Files In Maya, BVH or FBX]() For a better updated version of this tutorial please visit: http://www.instructables.com/id/How-To-Use-Mocap-Files-In-Maya-BVH-or-FBX/ This tutorial is made for Maya 2013, but I believe it should work in 2010-2015. If you are using a bvh file, download autodesks free bvh converter and convert i...
For a better updated version of this tutorial please visit: http://www.instructables.com/id/How-To-Use-Mocap-Files-In-Maya-BVH-or-FBX/ This tutorial is made for Maya 2013, but I believe it should work in 2010-2015. If you are using a bvh file, download autodesks free bvh converter and convert i... -
![Using Eclipse as a Maya IDE]() This tutorial was updated in May 2014. There are many choices when it comes to deciding on an IDE. At the time when I decided on Eclipse (back in 2005) I needed an editor that could do the following: useable across multiple platforms supported programming in Python, C++, mel...
This tutorial was updated in May 2014. There are many choices when it comes to deciding on an IDE. At the time when I decided on Eclipse (back in 2005) I needed an editor that could do the following: useable across multiple platforms supported programming in Python, C++, mel... -
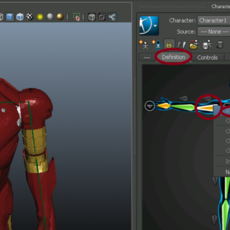
![Stress Create: Bend - Tutorial]() This tutorial shows how to use the tool Bend of Stress Create Script (vers. 1.0). Bend Stress is useful for wave movements of articulations. You can choose to move a root joint, or a non-root joint (parent). How it shows, you can use “Stress Create” to test your character rigging, or can use it t...
This tutorial shows how to use the tool Bend of Stress Create Script (vers. 1.0). Bend Stress is useful for wave movements of articulations. You can choose to move a root joint, or a non-root joint (parent). How it shows, you can use “Stress Create” to test your character rigging, or can use it t... -
![5 Bone Humanoid Rig]() The Starfish Rig Humanoid rig with 6(5 needed) bones Read this article in its natural habitat at: Starfish Rig @ Sota.dk Also available as PDF. Get it here: StarfishRig.pdf Note: This is not a application specific tutorial, rather a philosophy on severe optimization. There are many ways of o...
The Starfish Rig Humanoid rig with 6(5 needed) bones Read this article in its natural habitat at: Starfish Rig @ Sota.dk Also available as PDF. Get it here: StarfishRig.pdf Note: This is not a application specific tutorial, rather a philosophy on severe optimization. There are many ways of o... -
![the egg and the fog]() tutorial now at http://www.arnokroner.com/design/curriculum-development/tutorials/foggy-egg/
tutorial now at http://www.arnokroner.com/design/curriculum-development/tutorials/foggy-egg/ -
![uv 101]() tutorials are now at http://www.arnokroner.com/design/curriculum-development/tutorials/uv-mapping-101-part-2/ and http://www.arnokroner.com/design/curriculum-development/tutorials/uv-mapping-101-part-1/
tutorials are now at http://www.arnokroner.com/design/curriculum-development/tutorials/uv-mapping-101-part-2/ and http://www.arnokroner.com/design/curriculum-development/tutorials/uv-mapping-101-part-1/ -
![growing a stormy tree with paint effects]() now tutorial is at http://www.arnokroner.com/design/curriculum-development/tutorials/growing-windy-tree/
now tutorial is at http://www.arnokroner.com/design/curriculum-development/tutorials/growing-windy-tree/ -
![Ink drop effect in Maya]() Creating ink drop effect in Maya is relatively simple. We already covered the 2d ink drop effect in my previous tutorial. I recommend you to watch that tutorial first. Using 3d fluid container for creating liquids is very hard to control and stimulate. You need a good amount of RAM and har...
Creating ink drop effect in Maya is relatively simple. We already covered the 2d ink drop effect in my previous tutorial. I recommend you to watch that tutorial first. Using 3d fluid container for creating liquids is very hard to control and stimulate. You need a good amount of RAM and har... -
![IES light profile in Maya]() vishal rein 20,305 viewsHi Amigos, This tutorial is about IES profiles use in Mental Ray. Before getting into usage of IES profiles in Maya, we will try to know what is IES profile. IES stands for Illuminating Engineering Society. IES profile are file formats which store photometric data of r...
vishal rein 20,305 viewsHi Amigos, This tutorial is about IES profiles use in Mental Ray. Before getting into usage of IES profiles in Maya, we will try to know what is IES profile. IES stands for Illuminating Engineering Society. IES profile are file formats which store photometric data of r... -
![Creating a galaxy in Maya using Paint Effects]() This is a tutorial on how to make a space or galaxy effect in Maya. It could be used either to make a scene that a camera could zoom through or to make a background for an After Effects project or something like that. It is meant for people who have a basic understanding of Maya 2012 or 2013, ...
This is a tutorial on how to make a space or galaxy effect in Maya. It could be used either to make a scene that a camera could zoom through or to make a background for an After Effects project or something like that. It is meant for people who have a basic understanding of Maya 2012 or 2013, ...


Page 1 of 12