
Maya Tutorials
Tutorials
-
![4 Easy Steps to Rigging a Character with Rigger]() 1. Prepare the model for rigging 2. Create a skeleton. Adjust the orientation of the bones to your liking or use the default settings. 3. Use Rigger to create inverse kinematics chains (www.rigger.ws). 4. Skin the model www.rigger.ws
1. Prepare the model for rigging 2. Create a skeleton. Adjust the orientation of the bones to your liking or use the default settings. 3. Use Rigger to create inverse kinematics chains (www.rigger.ws). 4. Skin the model www.rigger.ws -
![rMuscle 1.0 tutorial]() Let's talk about rMuscle interface, and about creating and editing muscles. If you have rMuscles installed properly - you have rMuscle shelf in Maya. There are three "build" icons to build different kinds of muscles, and one "edit" button for editing tool. - "standart" muscle, that you can ...
Let's talk about rMuscle interface, and about creating and editing muscles. If you have rMuscles installed properly - you have rMuscle shelf in Maya. There are three "build" icons to build different kinds of muscles, and one "edit" button for editing tool. - "standart" muscle, that you can ... -
![handstretch]() hi guys, this tutorial will helps to create stretchy hand setup by using expressions . Here i explained abt problems of global control & solution tooo....... for more http://senthil-httpwwwyoutubecomwatchvdxiu24.blogspot.com/ regards senthil (senthil23051987@gmail.com)
hi guys, this tutorial will helps to create stretchy hand setup by using expressions . Here i explained abt problems of global control & solution tooo....... for more http://senthil-httpwwwyoutubecomwatchvdxiu24.blogspot.com/ regards senthil (senthil23051987@gmail.com) -
![Using "Rapid Rig: Advanced"]() The rapid rig is a tool designed to bridge the gap between character modeling and character animation. Using the user interface, the script enables the user to set up a bi-pedal character skeleton and rig in minutes, a process which can take up to several days. The advanced version of the rig co...
The rapid rig is a tool designed to bridge the gap between character modeling and character animation. Using the user interface, the script enables the user to set up a bi-pedal character skeleton and rig in minutes, a process which can take up to several days. The advanced version of the rig co... -
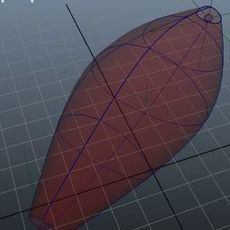
![Ribbon Spine Rig]() This simple tutorial will guide you in the creation of a Ribbon Stretchy Spine. Nowadays it's not as commonly used as the IK Spine Rig but it fits well in a cartoon rig. It will be fully stretchy and will have twist from the three controls we are going to create. First of all we ha...
This simple tutorial will guide you in the creation of a Ribbon Stretchy Spine. Nowadays it's not as commonly used as the IK Spine Rig but it fits well in a cartoon rig. It will be fully stretchy and will have twist from the three controls we are going to create. First of all we ha... -
![Advanced Eye Rig w/Nodes - Getting Eyelids to follow the Eyes]() Advanced Eye Rig w/Nodes – Getting Eyelids to follow the Eyes I’m sure you’ve all seen this in rigs you’ve gotten in class or from creativecrash.com, but couldn’t find any information on how to do it yourself. Until now! This is my most ambitious tutorial to date. I’ve provided a fin...
Advanced Eye Rig w/Nodes – Getting Eyelids to follow the Eyes I’m sure you’ve all seen this in rigs you’ve gotten in class or from creativecrash.com, but couldn’t find any information on how to do it yourself. Until now! This is my most ambitious tutorial to date. I’ve provided a fin... -
![How to make a character in maya (Professor Layton)]()
-
![Fast, Easy, Flexible Selection UI Method]() User Interfaces has been around for decades. For a while we had been using text input UI’s. There was a huge following for the voice-activated UI’s. But the most prevalent and most used UI is the graphic UI. People have been reinventing it ever since it’s first conception. So much so that...
User Interfaces has been around for decades. For a while we had been using text input UI’s. There was a huge following for the voice-activated UI’s. But the most prevalent and most used UI is the graphic UI. People have been reinventing it ever since it’s first conception. So much so that... -
![Creating Character Sets After Setting Animation Curves]() Creating Character Sets After Setting Animation Curves by: Earl Jordan This tutorial will show us how to create character sets to skeletons with animation already in place. As a standard operating procedure (SOP), usually we create these character sets befor...
Creating Character Sets After Setting Animation Curves by: Earl Jordan This tutorial will show us how to create character sets to skeletons with animation already in place. As a standard operating procedure (SOP), usually we create these character sets befor... -
![cartoony head squash n stretch]() This maya tutorial will take you through the procedure for setting up a head with stretch and squash ability to a character rig .Here I have made of lattice, joint and a bunch of utility nodes to get better control over the squash and stretch instead of using the non linear squash deformer.Th...
This maya tutorial will take you through the procedure for setting up a head with stretch and squash ability to a character rig .Here I have made of lattice, joint and a bunch of utility nodes to get better control over the squash and stretch instead of using the non linear squash deformer.Th... -
![Adaptive foot roll using utility nodes]() This tutorial will demonstrate how to setup foot roll for a character using remapValue utility node. I came across the need for this kind of setup when there was constant demand from animators of the project I am working on, in which they wanted control over when the toe roll gets triggered.(...
This tutorial will demonstrate how to setup foot roll for a character using remapValue utility node. I came across the need for this kind of setup when there was constant demand from animators of the project I am working on, in which they wanted control over when the toe roll gets triggered.(... -
![Rig spider Leg in maya]() In this tutorial we will rig a spider like robot, same settings will be used for rigging the insect legs. Most of the times the leg setup for this type of character will include using spring IK but, spring IK will force you to forget FK like movement like ball Row in biped characters. In this ...
In this tutorial we will rig a spider like robot, same settings will be used for rigging the insect legs. Most of the times the leg setup for this type of character will include using spring IK but, spring IK will force you to forget FK like movement like ball Row in biped characters. In this ... -
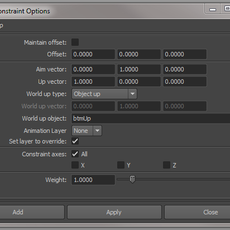
![advanced non flipping upper arm roll]() hello there! there are a few methods out there creating an upper arm roll, however, none of those methods work in all possible situations, so it's quite normal you will have to switch to one of 2 solutions (like backwards and forward arm or something like this). if you actually animati...
hello there! there are a few methods out there creating an upper arm roll, however, none of those methods work in all possible situations, so it's quite normal you will have to switch to one of 2 solutions (like backwards and forward arm or something like this). if you actually animati... -
![Seamless IKFK Arm Setup]() IK FK Arm Setup Tutorial A 45 min comprehensive tutorial on how to setup an ik/fk arm How to avoid some pit falls with building an ik fk setup Building simple animation controls Simple blending without constraints and using the power of utility nodes How to build a seamle...
IK FK Arm Setup Tutorial A 45 min comprehensive tutorial on how to setup an ik/fk arm How to avoid some pit falls with building an ik fk setup Building simple animation controls Simple blending without constraints and using the power of utility nodes How to build a seamle... -
![Keeping Zero rottions with a SplineIk]() Solution 1: Joint/Curve moving. When working with a SplineIK to quickly throw a character rig together it's a common problem to just throw it on the skeleton and hope for the best only to find that the curve that the SplineIK created has moved your joints to a non-Zero rotation screw...
Solution 1: Joint/Curve moving. When working with a SplineIK to quickly throw a character rig together it's a common problem to just throw it on the skeleton and hope for the best only to find that the curve that the SplineIK created has moved your joints to a non-Zero rotation screw... -
![Real Time Character Modeling Tutorial]() Below is a short tutorial showing the method I use when modelling a real time character. This approach can also be adopted when creating subdivision surface models. I hope some of you find it informative and useful. A summary of the key points that this tutorial will cover: * Start with ...
Below is a short tutorial showing the method I use when modelling a real time character. This approach can also be adopted when creating subdivision surface models. I hope some of you find it informative and useful. A summary of the key points that this tutorial will cover: * Start with ... -
![Facial Animation Rig for Delgo]() I am Warren Grubb, Animation Director for Fathom Studios on the film Delgo. (click here for the trailer) When we R&D for the feature film Delgo, I was Technical Director and I knew we would need a facial rig for our characters that was more powerful and flexible than standard multi-targe...
I am Warren Grubb, Animation Director for Fathom Studios on the film Delgo. (click here for the trailer) When we R&D for the feature film Delgo, I was Technical Director and I knew we would need a facial rig for our characters that was more powerful and flexible than standard multi-targe... -
![Bone-Based Mouth Setup]() This tutorial is for advanced Maya users to provide an alternative to the standard facial setup using blend shapes. I find that blend shapes are good for simple setups, but making all of those shapes gets tedious after a while and using the same shapes over and over can begin to look, well, "comp...
This tutorial is for advanced Maya users to provide an alternative to the standard facial setup using blend shapes. I find that blend shapes are good for simple setups, but making all of those shapes gets tedious after a while and using the same shapes over and over can begin to look, well, "comp... -
![Easy Object Pickup, How to have characters easily grab objects and keep them in their hand]() I real life, you don't have to worry about fingers passing through objects in order to pick them up. The density of your hand is sufficiently large enough to cause friction when you hand collides with other pieces of solid matter, thereby allowing you to grab hold of something and not letting it ...
I real life, you don't have to worry about fingers passing through objects in order to pick them up. The density of your hand is sufficiently large enough to cause friction when you hand collides with other pieces of solid matter, thereby allowing you to grab hold of something and not letting it ... -
![HUMAN INDIRECT SKINNING WITH FREE-FORM DEFORMERS I]() paul@paraform.com pthuriot@hotmail.com INTRODUCTION There�s only one thing you need to remember as you go through this tutorial: there�s no �one way� to setup a character for digital animation�this way just generally works for me�! Every animator/ studio is going to have thei...
paul@paraform.com pthuriot@hotmail.com INTRODUCTION There�s only one thing you need to remember as you go through this tutorial: there�s no �one way� to setup a character for digital animation�this way just generally works for me�! Every animator/ studio is going to have thei... -
![Bone Setup for a Dragon]() Hi, welcome back to my tutorial. This time I am going to show you how I setup bone for the dragon in the ready to animate way. Before I write this article, I've been completed a shot animated sequence of the dragon. A lot of mistake I've made during the setup, bind skin and IK. Most of the mistak...
Hi, welcome back to my tutorial. This time I am going to show you how I setup bone for the dragon in the ready to animate way. Before I write this article, I've been completed a shot animated sequence of the dragon. A lot of mistake I've made during the setup, bind skin and IK. Most of the mistak... -
![Poly Mechanical Modelling]() This will cover modeling the hand, starting with a polyCylander. Create a 12 sided cylander and rotate 90 dgrees on Z axis. Select three faces and extrude them. Flatten and move them as shown in the .gif below until you have a cool design. Scale the front smaller so that it will look like it fit...
This will cover modeling the hand, starting with a polyCylander. Create a 12 sided cylander and rotate 90 dgrees on Z axis. Select three faces and extrude them. Flatten and move them as shown in the .gif below until you have a cool design. Scale the front smaller so that it will look like it fit... -
![Wrap Skinning for Bone/Muscle Driven Skin Deformation]() The following concept overview will be covering Wrap Skinning for the purpose of actual muscle/bone deformation of the skin. The basic concept is: Skeleton Joints driving Bones driving Muscle movement/shape driving Skin deformation. Skeleton Joints>>Geometry Bones>>Geometry Muscle&...
The following concept overview will be covering Wrap Skinning for the purpose of actual muscle/bone deformation of the skin. The basic concept is: Skeleton Joints driving Bones driving Muscle movement/shape driving Skin deformation. Skeleton Joints>>Geometry Bones>>Geometry Muscle&... -
![MAKING AN ADVANCED LEG SKELETON]() by Bora Dayioglu for comments and suggestions; mailto:bora@animationartist.net Home Page Hi everyone, In this tutorial I tried to explain my solution to make an easy to animate leg skeleton approach. What I did is simply to create two simple leg skeletons to drive the main skeleton which ...
by Bora Dayioglu for comments and suggestions; mailto:bora@animationartist.net Home Page Hi everyone, In this tutorial I tried to explain my solution to make an easy to animate leg skeleton approach. What I did is simply to create two simple leg skeletons to drive the main skeleton which ... -
![Character Setup for Real-Time in Maya 3.0]() We have already covered creating a skeleton optimized for real-time not only in its number of joints but also in the way the axes of each joint is oriented. We will now address creating controls for the animator to use when positioning the character. This is in essence digital puppeteering. Cr...
We have already covered creating a skeleton optimized for real-time not only in its number of joints but also in the way the axes of each joint is oriented. We will now address creating controls for the animator to use when positioning the character. This is in essence digital puppeteering. Cr...


Page 1 of 2